
Lighting the pilot light on a water heater can seem daunting if you have never done it before. However, with the right instructions and precautions, this task can be straightforward and safe. Knowing how to light a pilot light on a water heater is essential for every homeowner, as it ensures your water heater operates efficiently. This guide will walk you through the necessary tools, preparation steps, and a detailed step-by-step process to light your pilot light successfully.
What Tools Do You Need?
Essential Tools
Before starting, gather all the necessary tools. You will need a long lighter or matchstick, a flashlight, and a screwdriver. These tools are crucial for accessing and lighting the pilot light on a water heater. Ensure your lighter or matches are long enough to reach the pilot light assembly without putting your hands too close to the flame. A long lighter is particularly useful as it provides more distance and control. Additionally, having a flashlight helps illuminate the dark areas around the pilot light assembly, making it easier to see what you are doing. A screwdriver is needed to remove any access panels covering the pilot light assembly. Make sure you have all these tools ready before proceeding to the next steps.
Safety Gear
Safety is paramount when dealing with gas appliances. Wear safety gloves and goggles to protect yourself from any accidental gas exposure. It’s also wise to have a fire extinguisher nearby in case of emergencies. Being prepared with the right safety gear ensures that you can handle the task without risking injury. Safety gloves protect your hands from potential burns or cuts, and goggles shield your eyes from any debris or sudden gas bursts. Having a fire extinguisher on hand adds an extra layer of safety, allowing you to quickly respond to any unexpected flames. By taking these precautions, you minimize the risk of accidents and ensure a safe environment while you work on lighting the pilot light on your water heater.
How to Prepare Your Water Heater
Turn Off the Gas
Start by turning off the gas supply to your water heater. Locate the gas valve on the water heater and turn it to the “Off” position. This step is crucial to prevent any gas leaks while you work on the pilot light. Wait a few minutes to let any residual gas dissipate. It is important to ensure that the area is well-ventilated during this process. Opening windows and doors can help disperse any lingering gas, reducing the risk of accidental ignition. Always double-check that the gas valve is securely turned off before moving on to the next steps. This precautionary measure is essential for maintaining a safe working environment and avoiding any potential hazards associated with gas leaks.
Locate the Pilot Light Assembly
Next, find the pilot light assembly. This is usually located near the bottom of the water heater, behind a small access panel. Use a screwdriver to remove the panel and set it aside. With the panel removed, you should see the pilot light burner and the gas control valve. Take your time to familiarize yourself with these components, as understanding their layout will make the lighting process smoother. The pilot light burner is where you will ignite the flame, and the gas control valve regulates the gas flow to the pilot light. By identifying these parts, you can proceed with confidence and avoid any confusion during the ignition process. Remember, knowing where everything is located is half the battle.

Step-by-Step Guide to Lighting the Pilot Light
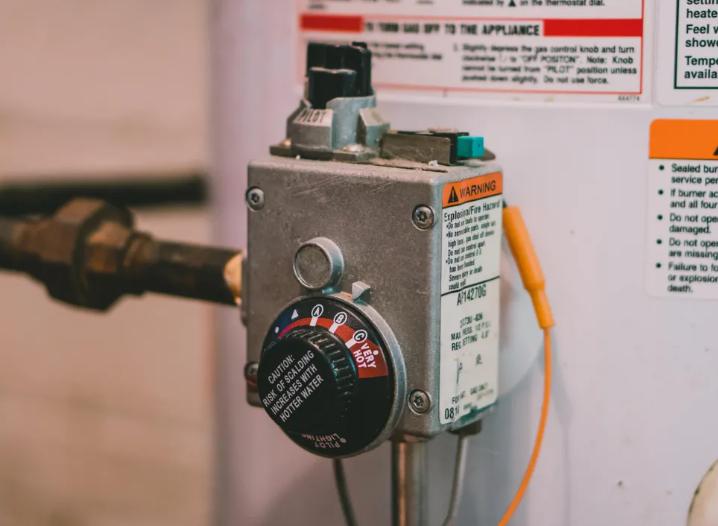
Setting the Controls
Before igniting, set the gas control valve to the “Pilot” position. This setting allows gas to flow to the pilot light only, preventing the main burner from igniting. Hold down the “Pilot” button to start the flow of gas to the pilot light. Continue holding this button throughout the ignition process. This step is crucial as it ensures a steady supply of gas to the pilot light. Without holding the “Pilot” button, the gas flow will not reach the pilot light burner, and you will not be able to ignite it. Make sure you understand the positions on the gas control valve, as setting it incorrectly can hinder the ignition process. Properly setting the controls is the foundation for successfully lighting the pilot light on your water heater.
Igniting the Pilot Light
While holding the “Pilot” button, use your lighter or match to ignite the pilot light. Position the flame near the pilot light burner and wait for the pilot to ignite. This might take a few tries. Once the pilot light is lit, keep holding the “Pilot” button for about 30 seconds to ensure the flame stays on. This step requires patience, as it can sometimes take a moment for the pilot light to catch and stay lit. If the flame goes out immediately after you release the button, you may need to hold it down a bit longer. Successfully igniting the pilot light is a satisfying moment and indicates that you are on the right track. By carefully following this step, you ensure that the pilot light remains stable and continues to function as intended.
Confirming the Pilot Light is Lit
After 30 seconds, slowly release the “Pilot” button. Check if the pilot light remains lit. If it goes out, repeat the igniting process. Once the pilot light stays lit, replace the access panel. Turn the gas valve back to the “On” position, and your water heater should start operating normally. This final confirmation step is essential to ensure that the pilot light will stay lit and the water heater will function properly. Carefully monitor the pilot light after releasing the button to ensure it remains stable. Replacing the access panel helps protect the pilot light assembly and maintain the efficiency of the water heater. Turning the gas valve back on completes the process, allowing your water heater to heat water as needed. By following these steps, you ensure a successful and safe relighting of the pilot light on your water heater.
Conclusion
Knowing how to light a pilot light on a water heater is a valuable skill that can save you time and money. By following the steps outlined in this guide, you can safely and effectively light your pilot light. Always prioritize safety by using the correct tools and wearing protective gear. If you encounter any issues or are unsure at any step, don’t hesitate to seek professional help. Ensuring your pilot light is lit correctly will keep your water heater functioning properly and provide your household with consistent hot water. Regular maintenance and inspections can also help prevent future issues, ensuring the longevity and efficiency of your water heater. With these skills, you can confidently manage this essential household task and ensure your home remains comfortable and functional.
FAQ
1. How long should I hold the pilot light button?
Hold the pilot light button for about 30 seconds after igniting the pilot. This allows the thermocouple to heat up and ensure the pilot light stays lit. During this time, the thermocouple generates a small electrical current that keeps the gas valve open. Holding the button for the full 30 seconds ensures the thermocouple reaches the necessary temperature to maintain the gas flow.
2. What should I do if I smell gas?
If you smell gas, immediately turn off the gas supply and ventilate the area. Do not attempt to light the pilot light. Contact a professional to inspect your water heater for leaks. Gas leaks are serious and can pose significant safety risks. Evacuate the area if the smell is strong, and avoid using any electrical appliances or open flames until the situation is resolved.
3. How often should I check my pilot light?
Regularly check your pilot light every few months to ensure it is functioning properly. Frequent inspections can help identify potential issues early and maintain the efficiency of your water heater. Monitoring the pilot light regularly helps ensure it remains stable and reduces the risk of unexpected outages. Keeping the pilot light clean and free of debris also contributes to its longevity and reliability.