
Testing your water heater element is crucial for maintaining an efficient water heating system. Ignoring a faulty element can lead to inconsistent water temperatures and higher energy bills. By learning how to test your water heater element, you can save time, money, and ensure your water heater operates at its best. This guide will walk you through the necessary steps and tools required for the testing process, ensuring you can confidently perform this essential maintenance task. Let’s dive into the specifics of how to test water heater element effectively.
Why Should You Test Your Water Heater Element?
Common Signs of a Faulty Water Heater Element
A faulty water heater element often shows clear signs that it needs attention. If you notice water taking longer to heat up or if the water isn’t as hot as it used to be, your element might be failing. Other signs include fluctuating water temperatures and a complete lack of hot water. Regularly checking for these symptoms can help you catch issues early, preventing further damage to your water heater. Keeping an eye on these signs ensures your water heater remains efficient and reliable.
Benefits of Regular Testing
Regular testing of your water heater element offers multiple benefits. It ensures that your water heater operates efficiently, saving you money on energy bills. Early detection of issues can prevent costly repairs or replacements. Additionally, regular maintenance extends the lifespan of your water heater, providing you with consistent hot water. By making testing a routine task, you can enjoy a reliable and cost-effective water heating system in your home.
What Tools Do You Need to Test a Water Heater Element?
Essential Tools and Equipment
To test your water heater element, you’ll need a few essential tools. A multimeter is the primary tool required for testing the electrical resistance of the element. You’ll also need a screwdriver to access the element, and a wrench might be necessary to remove it. Ensure you have a notepad and pen to record your readings. Having these tools on hand will make the testing process smooth and efficient, allowing you to accurately diagnose any issues with your water heater element.
Safety Precautions Before You Start
Safety should be your top priority when testing your water heater element. Always turn off the power supply to the water heater before beginning. This prevents the risk of electric shock. Use insulated tools to further protect yourself. Wear safety gloves and goggles to safeguard against any accidental splashes of hot water or debris. By following these precautions, you can ensure a safe and effective testing process.
How to Test Water Heater Element: Step-by-Step Instructions
Step 1: Turn Off the Power Supply
Before you begin, ensure the power supply to the water heater is completely turned off. Locate the circuit breaker panel in your home and switch off the breaker connected to the water heater. Double-check by trying to turn on the water heater; it should remain off. This step is critical to avoid the risk of electric shock during the testing process. Once you’re certain the power is off, you can safely proceed to the next step.
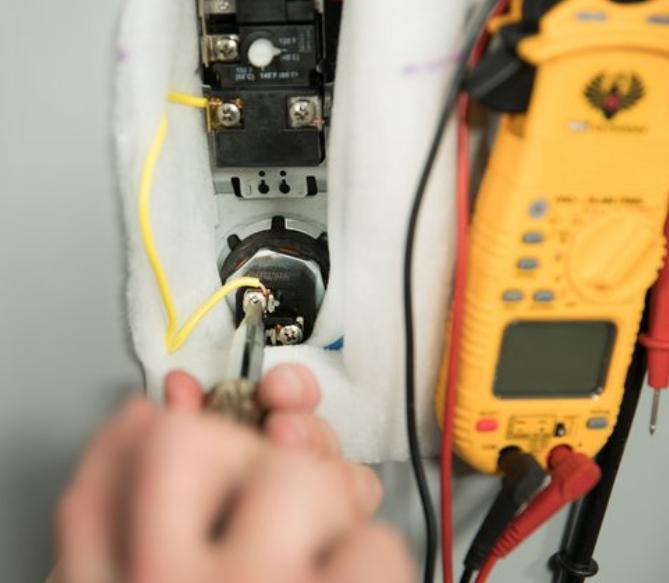
Step 2: Access the Water Heater Element
Next, access the water heater element by removing the access panel. Use a screwdriver to unscrew the panel, exposing the element and its wiring. Depending on your water heater model, you may need to remove some insulation to fully expose the element. Carefully set aside any screws or panels you remove. This step allows you to reach the element and prepare it for testing with your multimeter. Make sure everything is properly exposed before moving on.
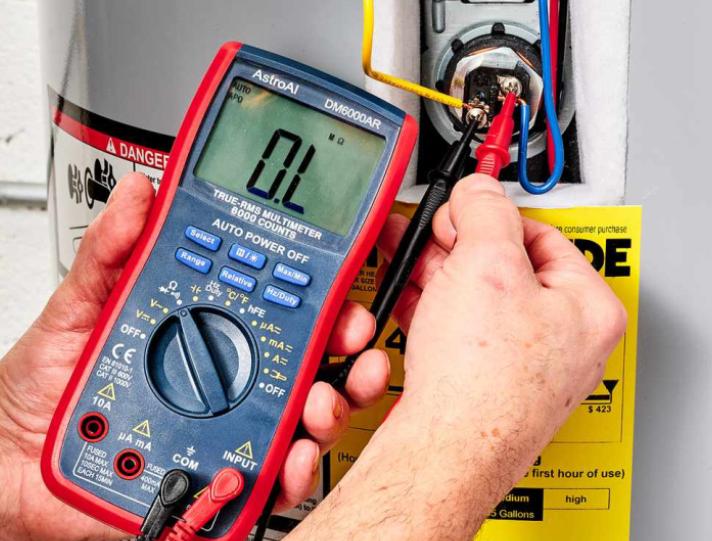
Step 3: Test the Element with a Multimeter
Set your multimeter to the lowest ohms setting for resistance testing. Place one probe on one of the element’s screws and the other probe on the other screw. A functioning element typically shows a reading between 10 and 30 ohms. If the reading is outside this range or if the multimeter shows no movement, the element is likely faulty. This test measures the electrical resistance, helping you determine if the element can conduct electricity properly.
Step 4: Interpret the Multimeter Readings
Interpreting the multimeter readings is straightforward. A reading between 10 and 30 ohms indicates the element is functioning correctly. If you get a reading of zero, it means there’s a short circuit, and the element needs replacing. A reading of infinity or no movement indicates the element is broken and cannot conduct electricity. Accurate interpretation of these readings helps you decide whether to replace the element or check for other issues.
Step 5: Reassemble and Restore Power
After testing, carefully reassemble the water heater. Replace any insulation and reattach the access panel using the screws you set aside. Once everything is securely in place, restore power to the water heater by switching the circuit breaker back on. Turn on the water heater to ensure it operates correctly. This step completes the testing process, ensuring your water heater is ready for regular use.
Additional Tips for Accurate Testing
For the most accurate results, ensure your multimeter is properly calibrated. Test the multimeter on a known working element to verify its accuracy. Additionally, consider testing both elements if your water heater has two, as one faulty element can affect overall performance. Always follow the manufacturer’s instructions for your specific water heater model. These tips enhance the accuracy and reliability of your testing process.
Conclusion
Testing your water heater element is a straightforward process that can save you time and money. By following these step-by-step instructions, you ensure your water heater operates efficiently and effectively. Regular testing helps you catch issues early, maintaining a consistent hot water supply and preventing costly repairs. Now that you know how to test water heater element, you can confidently perform this essential maintenance task and keep your water heater in top condition.
FAQs
1. How often should I test my water heater element?
Testing your water heater element every six months ensures it remains in good working condition. Regular testing helps identify potential issues early, allowing you to address them before they become major problems. Consistent testing also extends the lifespan of your water heater and maintains efficient performance.
2. What are the risks of not testing the water heater element?
Failing to test your water heater element can lead to inconsistent water temperatures, higher energy bills, and potential damage to the water heater. A faulty element can cause the heater to overwork, increasing the risk of overheating and other issues. Regular testing helps prevent these problems and ensures reliable hot water supply.
3. Can I test the water heater element without a multimeter?
While a multimeter is the most accurate tool for testing a water heater element, you can perform a basic test using a continuity tester. However, a continuity tester may not provide as detailed information as a multimeter. For precise results, using a multimeter is recommended.